
When it comes to growing indoor plants, few can match the elegance and allure of orchids. Their exotic blooms and intricate structures make them a favorite among houseplant lovers worldwide. But orchids are also known to be a bit fussy — especially about their roots and water. The number one killer of orchids? Root rot.
Given this, it might seem almost paradoxical to ask: Can you grow orchids in water? Surprisingly, the answer is yes. And no, it’s not a gimmick — growing orchids hydroponically is an actual method that many indoor gardening enthusiasts are exploring with great success.
In this in-depth guide, we’ll cover everything you need to know about growing orchids in water, explore different hydroponic methods, and walk you through each process — so you can decide whether it’s a myth, a hack, or a viable alternative for your orchid care routine.
Why Consider Growing Orchids in Water?
When most people think of growing plants, they imagine soil — rich, earthy, and essential. But orchids aren’t like most houseplants. These exotic beauties are often classified as epiphytes, which means they don’t naturally grow in soil at all. Instead, they cling to trees or rocks in tropical forests, absorbing moisture and nutrients from the rain and humid air around them.
Orchids Prefer Air Over Soil
In their native environments, orchid roots are fully exposed. They wrap around bark, dangle freely in the open air, or rest lightly on mossy rocks. Their roots have adapted to breathe air, absorb occasional rainfall, and dry out quickly afterward. This means they’re perfectly fine with moisture — but only when it’s accompanied by good airflow.
Contrast that with what happens when you plant an orchid in a regular pot with bark or moss: over time, the potting media starts to break down, compact, and hold too much moisture. The natural airflow that orchid roots crave becomes restricted. The result? A soggy environment lacking oxygen.
So, Why Do Orchids Rot in Pots?
Here’s the core issue: orchid roots don’t hate water — they hate being smothered.
Potting media like bark and sphagnum moss may seem orchid-friendly at first, but they decompose over time, especially when they stay damp for too long. As the organic matter breaks down, it compresses and blocks airflow to the roots. This oxygen-deprived environment is a breeding ground for bacteria and fungi.
Think of it like this: if you were to wear soaking-wet socks for days, your skin would break down, too. Orchid roots go through a similar fate when they’re trapped in soggy media — leading to what growers call root rot.
How Water Culture Can Help
This is where hydroponic orchid growing (i.e., growing orchids in water) comes in. It might sound contradictory to grow orchids — which are so sensitive to “too much water” — in water. But here’s the catch: it’s not the water itself that’s dangerous. It’s the lack of oxygen in decomposing soil that causes the real harm.
By growing orchids in water — through methods like semi-hydroponics, semi-water culture, or full-water culture — you’re completely eliminating the decaying potting mix. That means:
- No rotting bark or moss to cut off air supply
- Cleaner roots that are easier to inspect
- Fewer pests and fungal infections
- A setup that more closely mimics how orchids live in the wild
These hydroponic methods also allow water and oxygen to coexist around the roots, which is exactly what orchids are used to in nature. Instead of stagnant soil, they get the benefit of clean, nutrient-rich water combined with airflow — creating a healthier environment overall.
Orchids are among the most popular indoor plants for a reason — they’re stunning, long-lasting, and thrive in the warm, humid conditions common in many homes. By adopting a hydroponic growing system, you’re aligning their care with their natural instincts.
So, if you’ve ever struggled with rotting orchid roots or simply want to try a cleaner, more modern way to grow houseplants, growing orchids in water is a worthwhile approach. It may not be magic, but it’s definitely a science-backed method that aligns with how orchids have evolved to grow for centuries.
Three Proven Methods to Grow Orchids in Water
There are three primary methods of growing orchids hydroponically:
- Semi-Hydroponics
- Semi-Water Culture
- Full-Water Culture
Each method offers different advantages and suits different types of growers and orchids. Let’s dive into the details of each.
1. Semi-Hydroponics (LECA Method)
Best for beginners trying hydroponics for the first time
What It Is:
Semi-hydroponics involves placing the orchid in LECA pellets (Lightweight Expanded Clay Aggregate) inside a container with a small reservoir of water. The clay pellets wick moisture up to the roots, ensuring they stay hydrated but aerated.
Benefits:
- Reduces risk of root rot
- Minimal repotting required
- Allows easy root visibility
- Keeps humidity levels higher around roots
- Eliminates pests from organic soil
Drawbacks:
- Requires initial investment in LECA, container, and hydroponic fertilizer
- Exposed roots can become sensitive to direct sunlight
- May need special containers for root support
How to Do It:
- Rinse LECA pellets and soak for 24–48 hours.
- Remove the orchid from its pot and gently wash off all old potting mix.
- Trim unhealthy roots using a clean, sharp tool.
- Place LECA in a glass or plastic container with no soil.
- Add orchid and fill up to about 1 inch of LECA with water.
- Keep in bright, indirect light.
- Refresh water every few weeks and flush the system to prevent salt buildup.
2. Semi-Water Culture (Soak and Dry Method)
Best for disciplined plant parents who like structure and observation
What It Is:
This method involves cycling the orchid’s roots between being submerged in water and left dry. Typically, orchids are soaked for 2–5 days and then dried for 1–3 days. There’s no media involved — just the orchid, water, and air.
Benefits:
- Zero potting mix = zero rot risk from decaying material
- More natural for moisture-loving orchid species
- Boosts humidity through evaporation
- Cheap to set up
Drawbacks:
- Requires strict schedule
- Needs hydroponic fertilizer
- Roots are exposed and more vulnerable to sunlight
- Orchid may need support if container doesn’t hold it well
How to Do It:
- Remove orchid and clean roots thoroughly.
- Trim any dead or rotted root material.
- Place in a glass jar with a hydroponic nutrient solution.
- Soak roots for 2–5 days, then remove and allow to air-dry for 1–3 days.
- Repeat cycle continuously.
- Change water regularly to prevent buildup or bacterial issues.
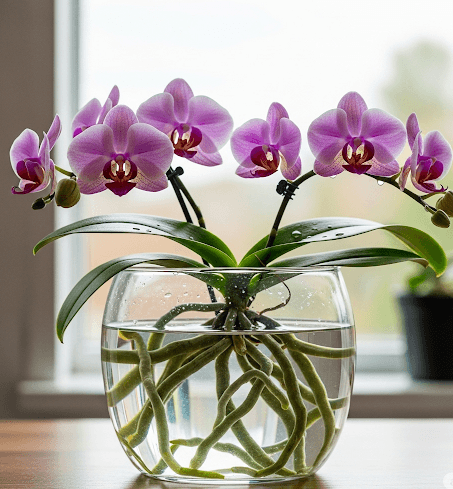
3. Full-Water Culture (Submerged Method)
Best for low-maintenance orchid care once setup is complete
What It Is:
In full-water culture, orchids remain in water all the time — but only the bottom quarter of the roots are submerged. This keeps most roots in the air while absorbing moisture from the water and humidity.
Benefits:
- Very low maintenance
- No soil means fewer pests
- Increases air humidity around the orchid
- Makes root health easy to inspect
Drawbacks:
- Hydroponic fertilizer is necessary
- Exposed roots are vulnerable to sunlight
- Supporting the orchid in the container may be tricky
- Not suitable for every orchid species
How to Do It:
- Clean the roots thoroughly and remove potting mix.
- Submerge the bottom 1/4 of the roots in a glass container with clean water.
- Add hydroponic fertilizer (and optional rooting hormone).
- As water evaporates, refill with clean, fertilized water.
- Watch for root health signs like mushiness or discoloration.
Which Orchids Are Best for Water Culture?
Not every orchid is cut out for hydroponic life. The following are best suited:
- Phalaenopsis (recommended for beginners)
- Vanda (loves high humidity and water)
- Dendrobium (Antelope type)
Avoid using this method for Cattleya, Oncidium, and other orchids that require dry rest periods. They are more prone to stress and rot in wet conditions.
Key Supplies for Hydroponic Orchid Growing
To succeed in water-based orchid care, you’ll need:
- Glass or clear plastic containers
- LECA pellets (for semi-hydroponics)
- Hydroponic fertilizer (liquid form)
- Rooting hormone (optional)
- Sharp sterilized scissors
- Distilled or filtered water
These materials help reduce the risk of contamination, provide nutrients in water-only environments, and allow better visibility of root health.
Pros & Cons of Hydroponic Orchid Growing
| Pros | Cons |
|---|---|
| No soil = less rot | Requires hydroponic fertilizer |
| Fewer pests | Exposed roots need protection |
| Monitor roots easily | Some methods are high maintenance |
| Elevated humidity | May need special containers |
| Less guesswork in watering | Not all orchids are compatible |
Final Thoughts: Is It Worth Trying?
If you’re an indoor plant enthusiast looking to elevate your orchid care or reduce root rot risks, growing orchids in water is worth exploring. While it’s not a shortcut or magic hack, this method offers real benefits — especially for those willing to put in the initial effort.
For beginners, semi-hydroponics is the best place to start. It offers a balance between low maintenance and strong root health benefits. If you’re more experienced or enjoy a plant care routine, then semi-water culture could be a fun experiment.
So yes — you can grow orchids in water. Just do it with care, knowledge, and the right setup, and you’ll have stunning houseplants that thrive in a cleaner, smarter way.
If you’re more comfortable with traditional care or prefer potting mix over water culture, we’ve got you covered.
Check out The Orchid Enthusiast’s Handbook — a guide for thriving orchids in soil, bark, or moss setups.
FAQs
1. Can I grow any orchid in water?
A: Not all orchids thrive in water. Start with Phalaenopsis, Vanda, or Dendrobium species that have robust roots and high humidity tolerance.
2. Do I still need to fertilize orchids grown in water?
A: Yes, hydroponic orchids require special liquid fertilizer since there’s no soil to break down nutrients.
3. Is LECA necessary for growing orchids in water?
A: No, but it helps a lot. LECA is essential in semi-hydroponic setups for moisture and airflow.
4. Can I use tap water?
A: It’s better to use distilled or filtered water to avoid mineral buildup and chlorine damage.
5. Will the orchid bloom again in water culture?
A: Yes! With proper care, orchids can bloom in hydroponic environments, just like in traditional ones.


1 thought on “How to Grow Orchids in Water: A Complete Guide to Hydroponic Orchid Care for Indoor Plant Lovers”
IAM SO AMAZED WITH THIS INFO PROVIDED BY THE NURSEY.COM AND I CANNOT BELIEVE THAT I HAD ALREADY OBTAIN WITHIN THIS SOLUTIONS, BUT TO ACTUALLY READ IT AND NOW B E ABLE TO APPLY IT IS AWE….
BEST