


Rubber plants (Ficus elastica) are beloved for their glossy, deep green leaves and their ability to thrive in a variety of indoor environments. But even the most low-maintenance houseplants can show signs of distress—and one of the most common symptoms plant parents notice is brown leaves on rubber plants.
If you’ve been asking yourself, “Why are the edges of my rubber plant leaves turning brown?” or “How do I fix brown leaves on my houseplant?”—this guide is for you.
In this in-depth article, we’ll walk you through:
- The main causes of browning leaves
- How to diagnose the issue
- Simple solutions to revive your rubber plant
- Preventive care tips to keep your plant healthy
- FAQs to answer your most pressing questions
Let’s bring your rubber plant back to life, one leaf at a time.
What Causes Brown Leaves on Rubber Plants?
1. Overwatering
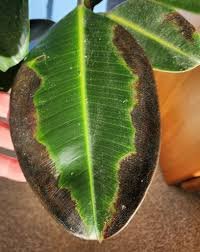
Overwatering is the #1 cause of brown leaf tips or patches. While rubber plants love moist soil, they do not tolerate soggy roots. Dull brown or black patches usually appear at the edges of the leaves first, signaling root suffocation and rot.
Fix:
- Check the top 1–2 inches of soil before watering. If it’s still moist, hold off.
- Reduce watering frequency in winter.
- Use bottom watering to help the soil soak up water evenly.
Pro Tip: Blackening along with browning could also indicate a fungal or bacterial infection—usually caused by overwatering. Improve airflow, avoid wetting leaves, and make sure your pot has drainage.
2. Poor Drainage
Good drainage is essential for any indoor plant, but especially for rubber trees. A pot without drainage holes or using compacted soil traps water at the root level.
Fix:
- Repot your plant into a container with multiple drainage holes.
- Use a well-draining mix: 2 parts indoor potting soil, 1 part perlite, 1 part chunky orchid bark.
- Empty saucers or cache pots after watering to prevent root rot.
3. Underwatering
Dry, crispy brown edges often signal the opposite problem—underwatering. If the soil is bone dry or the plant is rootbound, water can’t reach the foliage, and leaves suffer.
Fix:
- Deep water the plant or use the bottom watering technique.
- Establish a watering schedule based on environment and season.
- Ensure water reaches all the way down to the root ball.
4. Lack of Light
Rubber plants need bright, indirect light. A dark corner or a room with no windows may lead to browning, leaf drop, and poor overall growth.
Fix:
- Place your plant near a south- or west-facing window.
- Avoid harsh midday sun to prevent scorching.
- Rotate the pot every few weeks for even light exposure.
5. Low Humidity
Originating from tropical regions, rubber plants thrive in humid conditions. Dry indoor air—especially during winter—can cause brown tips and stress.
Fix:
- Mist the leaves a few times a week.
- Use a pebble tray or humidifier to boost moisture in the air.
- Group plants together to create a micro-humid environment.
6. Nutrient Deficiency
Lack of essential nutrients like nitrogen, magnesium, or potassium can cause curling, yellowing, and browning of leaves.
Fix:
- Feed your rubber plant every 4 weeks in the spring and summer using a balanced liquid fertilizer.
- Avoid over-fertilizing; this can burn the roots and lead to more browning.
7. Temperature Shock
Rubber plants prefer a stable environment. Sudden drops or spikes in temperature (below 65°F or above 85°F) can shock the plant, leading to brown patches and leaf drop.
Fix:
- Keep away from AC vents, radiators, and drafty windows.
- Maintain consistent room temperatures year-round.
- Avoid relocating your plant too often.
8. Leaf Spot Diseases
Brown spots with yellow halos or irregular shapes might indicate a fungal or bacterial leaf spot disease.
Fix:
- Remove infected leaves with sterilized scissors.
- Avoid splashing water on the leaves when watering.
- Increase airflow or use a fan near your plant.
9. Natural Aging
If only the lower, older leaves are browning and dropping, this could be a natural shedding process. As long as new leaves are healthy, there’s no need to panic.
Fix:
- Prune aging leaves to encourage new growth.
- Monitor for excessive browning to rule out other causes.
Rubber Plant First Aid: What to Do Immediately
When your beloved rubber plant starts showing brown leaves, don’t panic—treat it like a mini emergency room situation. The sooner you act, the better your chances of saving the plant and encouraging healthy new growth. Here’s a more detailed look at the essential steps:
1. Isolate the Plant
If there’s even a small chance that pests or disease are at play, immediately move the rubber plant away from your other indoor houseplants. Infections and insects can spread surprisingly fast—especially in warm, humid environments.
Pro tip: Always quarantine new plants for at least 7-10 days after bringing them home to prevent introducing pests to your plant collection.
2. Check Soil Moisture Levels
Insert your finger about 1 to 2 inches deep into the soil to assess its moisture content:
- Dry and crumbly? Your plant is likely underwatered.
- Soggy and heavy? That’s a sign of overwatering, poor drainage, or even root rot.
If you’re unsure, you can also use a moisture meter for more accurate readings. Remember, rubber plants like their soil evenly moist—not bone-dry, and not soaking wet.
3. Inspect Drainage and Potting Conditions
Improper drainage is a common but overlooked issue. Flip the pot gently or peek underneath:
- Are there drainage holes at the bottom of the pot?
- Is water pooling in the saucer or cache pot?
- Is the soil compacted and retaining too much moisture?
If any of the above is true, it’s time to repot your rubber plant in a well-draining mix (ideally with perlite and bark) and use a pot that allows excess water to escape.
4. Evaluate Lighting Conditions
Rubber plants thrive in bright, indirect light. Too little light and your plant may not absorb water efficiently—leading to excess moisture in the soil. Too much direct sunlight, on the other hand, can scorch the leaves and cause brown patches or edges.
Throughout the day, observe:
- How much natural light the plant receives?
- Is the light filtered or direct?
- Are shadows from blinds or curtains blocking the plant?
If your plant is in a low-light corner or near a harshly sunlit window, it might be time to reposition it to a better-lit spot, like a few feet away from a south- or west-facing window with a sheer curtain.
5. Look Closely for Pests
Browning leaves can be a stress response to a pest infestation, even if you don’t see bugs at first glance. Conduct a thorough inspection:
- Flip the leaves and check both the top and underside.
- Look for tiny crawling insects, sticky residue, fine webbing, or white cottony spots.
Common pests that affect rubber plants:
- Spider mites: These are tiny, almost invisible pests that leave fine webs and suck moisture from the leaves.
- Mealybugs: These appear as white, fuzzy blobs and cluster in leaf joints or on stems.
- Scale insects: Small, brown, oval-shaped bugs that look like bumps on stems or leaves.
If you notice any pests:
- Wipe the leaves with a damp cloth dipped in diluted neem oil or rubbing alcohol.
- Use an insecticidal soap spray for more severe infestations (always test on a small area first).
- Increase air circulation and isolate the plant until it’s pest-free.
6. Take a Deep Breath and Observe
Once you’ve taken the above steps, give your plant a few days to respond. Avoid making multiple major changes at once (like repotting and fertilizing on the same day), as this can further stress the plant.
Keep an eye out for:
- New growth appearing at the nodes.
- A halt in leaf drop or browning.
- Overall improvement in leaf firmness and color.
Taking swift, thoughtful action when you first notice symptoms can save your plant from serious decline. By giving your rubber plant a proper check-up and addressing issues immediately, you’ll set it on the path to recovery and long-term indoor success.
How to Prevent Brown Leaves on Indoor Rubber Plants
Prevention is better than cure—especially when it comes to houseplants. Here are rubber plant care tips for keeping your indoor jungle green and happy:
| Care Factor | Best Practices |
|---|---|
| Watering | Water when the top 1–2 inches of soil are dry. Avoid soggy soil. |
| Soil Mix | Use well-draining soil with perlite and bark for aeration. |
| Humidity | Maintain 40–50% humidity. Mist leaves or use a humidifier. |
| Lighting | Provide bright, indirect sunlight. Avoid harsh direct rays. |
| Fertilizing | Feed monthly in spring/summer with balanced houseplant fertilizer. |
| Temperature | Keep between 65°F and 85°F (18–29°C). Avoid sudden drafts. |
| Repotting | Repot every 1–2 years or when rootbound. Use slightly larger pots. |
| Cleaning | Wipe leaves with a damp cloth to remove dust and boost shine. |
| Pest Checks | Regularly inspect for pests or fungal infections. |
Should You Remove Brown Leaves?
Yes! If a rubber plant leaf has turned completely brown or is heavily damaged:
- Use sharp, sterilized scissors or pruners.
- Cut at the base of the stem or just above a node.
- Always clean your tools after use to prevent disease spread.
Should You Remove Brown Leaves from Your Rubber Plant?
Absolutely, yes—and here’s why it’s not just about aesthetics, but also about plant health.
Brown or damaged leaves on a rubber plant (Ficus elastica) not only look unsightly, but they can also become entry points for pests and diseases. If left unchecked, decaying plant tissue can harbor bacteria or fungi, especially in humid indoor environments. Regular pruning encourages healthier foliage, stimulates new growth, and prevents stress from spreading to other parts of the plant.
Why It’s Important to Remove Brown Leaves:
1. Stops Disease from Spreading
Dead or dying leaves are more susceptible to rot, mold, and disease. Fungal spores, bacteria, and pests are more likely to target these weakened areas and then move onto healthy parts of the plant. Removing these leaves early can save the rest of your plant.
2. Prevents Energy Drain
A plant still tries to send nutrients and moisture to every part of its foliage, even if a leaf is dying. By trimming off brown leaves, you allow your rubber plant to redirect energy to healthy leaves and new growth instead of wasting it on irrecoverable tissue.
3. Improves Air Circulation
Pruning enhances air movement between the leaves, reducing moisture build-up and the risk of fungal infections like powdery mildew and leaf spot diseases.
4. Boosts Aesthetic Appeal
A clean, well-trimmed rubber plant with glossy, green leaves becomes an instant focal point in any indoor setting. Pruning enhances its natural beauty and keeps your interior design looking polished and intentional.
How to Prune Brown Leaves Properly
Proper technique is essential when removing brown leaves to avoid unnecessary damage or infection.
Use Clean, Sharp Tools
Always sterilize your pruning scissors or plant shears before and after trimming. Use rubbing alcohol, hydrogen peroxide, or boil them for a few minutes. Dirty tools can transfer pathogens from one plant to another.
Cut at the Right Spot
- Fully brown leaves: Cut at the base of the stem, close to the trunk or main stalk.
- Partially damaged leaves: You can trim just the affected portion, following the leaf’s natural shape.
- Cut just above a node or where the leaf meets the stem—this encourages new growth from that point.
Dispose of Leaves Safely
Don’t leave trimmed brown leaves in the pot or compost bin if you suspect disease. Dispose of them in the trash to prevent spread.
What Does a Healthy Rubber Plant Look Like?
A thriving indoor rubber plant will show:
- Large, waxy, glossy leaves
- New growth during spring and summer
- No signs of leaf curling, yellowing, or spotting
- Even leaf distribution from base to top
Bonus: Quick Repotting Guide
Repot your rubber plant if:
- The roots are coming out of drainage holes.
- Water drains too quickly or not at all.
- The soil has compacted over time.
Repotting Steps:
- Choose a pot one size larger with drainage holes.
- Mix fresh soil: 60% indoor mix + 20% orchid bark + 20% perlite.
- Gently remove the plant, shake off old soil, and inspect roots.
- Trim any mushy, brown roots (signs of rot).
- Repot and water lightly.
Final Thoughts
Rubber plants are durable, elegant additions to any indoor plant collection, but they do require mindful care. Browning leaves are your plant’s way of telling you something’s off—whether it’s water, light, or humidity. By following the steps above and keeping a close eye on your plant’s environment, you’ll set the stage for a long-lasting, lush, and vibrant rubber tree.
FAQs
Q1: Should I cut off brown leaves on my rubber plant?
Yes. Trim dead or damaged leaves using clean, sharp scissors to encourage healthy regrowth.
Q2: Can I mist my rubber plant to increase humidity?
Yes, but misting only helps slightly. For real results, use a humidifier or pebble tray.
Q3: How often should I water a rubber plant indoors?
Water when the top 1–2 inches of soil feel dry. It could be every 7–10 days depending on conditions.
Q4: Do rubber plants need direct sunlight?
No. They prefer bright, indirect light. Too much direct sun can cause leaf scorch.
Q5: Why are only the lower leaves turning brown?
This is often part of the plant’s natural life cycle. If new growth is healthy, there’s no issue.

With just a little attention, your rubber plant can thrive and become the natural showstopper your living space deserves.